|
EvolvingBehavior
0.2.0
|

|
The LifeCycleActor: Managing the Experiment's Life Cycle
The LifeCycleActor controls how the evolution progresses: its timing, fitness measurements, and so forth. To start using EvolvingBehavior, you should add exactly one LifeCycleActor to your scene. You will then want to set several properties on it, to determine how fast and how long your experiment should run, among other details.
Life Cycle Properties

You can set various properties to control the evolutionary life cycle.
- Trial Length (in in-game seconds): This determines the time limit for each generation of the evolution. When this time expires, the scene will be restarted with a new generation of behavior trees. Note that this is in-game time, not real-time, so even if you change the Game Speed Modifier, the trial will still simulate the same period of gameplay.
- Total Trials: The number of generations over which to run the evolution. After this many generations, the experiment will end.
- Trial Size: The number of behavior trees to generate in each generation. This should ideally be the same as the number of AI agents who will be spawned in the level to test each individual, generated behavior tree.
- Game Speed Modifier: This multiplies the game speed. You can set this higher to accelerate the experiment, but note that setting it too high may cause strange behavior in the physics system.
- Experiment Ending Map: The map to load when the experiment is completely finished.
The LifeCycleActor also controls Saving and Loading, which will be described later along with its associated settings.
The EvolutionControlActor: Specifying Settings for Each AI Population
The EvolutionControlActor is the invisible actor that will control how EvolvingBehavior works for a specific population (type) of AI agent in your experiment/game. To begin using the plugin to evolve a type of AI, first add an EvolvingControlActor to your scene. If you have multiple types of AI to evolve, you can add one EvolutionControlActor per AI type, and set their settings individually.
To associate an EvolutionControlActor with a particular type of AI, the easiest way is to set a Tag on the EvolutionControlActor with the name of that population/type. Separately, in code or blueprints when spawning actors for that specific type of AI, you will then find the specific EvolutionControlActor by tag, and ask it to provide behavior trees for that specific AI type (or, instead of using tags, you could also search by name, or set a direct refrence to the EvolutionControlActor). We will show example code for this later, when talking about Spawning NPCs.
The EvolutionControlActor contains the Evolution Manager Component, which provides the settings for the population.
If you need access to parts of these components, such as the Population Manager and the Fitness Tracker, you can retrieve the EvolutionControlActor from the scene and access its components. We provide a helper method that can be called from C++ or Blueprints (defined in EvolutionControlActor.h), called GetEvolutionControlActors, to easily retrieve the evolution control actor from the scene.
The Evolution Manager Component
The next step is to set up the BTEvolution Manager component. It will also be automatically created on the EvolutionControlActor.
The BTEvolutionManager component handles the evolution process of the "population" of Behavior Trees evolved from your initial, hand-designed tree.
You will need to specify the following sets of properties:
- The Fitness Calculator for measuring the performance of each agent and determining their fitness for serving as parents to the next generation.
- The Template Collection containing the starting behavior tree and extra nodes.
- The Generated Template Library containing the information to generate completely new nodes of various kinds.
- The Reproducer for creating new behavior trees out of old ones.
- The Parent Selector for choosing which behavior trees to use as parents, based on their fitness, for creating the next generation.
- The Initial Population settings for randomly mutating your hand-designed behavior tree, if desired, to create more variety in the starting population.
Determining Fitness
Fitness calculation is important for guiding the evolution of your behavior tree. You will want to try to define fitness functions that determine the degree to which each behavior tree's actions meet your goals. It can be difficult to capture all of your goals in numeric calculations, however, so you may need to iterate on your fitness functions and try various approaches. Inspecting and interacting with the resulting agents may also help you determine how well the resulting agents meet your needs, even if the fitness functions are not perfect.
You will need to specify a Fitness Calculator in the Evolution Manager Component. The Fitness Calculator controls how all the different fitness calculations are combined to determine the final fitness for the agent. Usually, you can use the built-in Linear Weight Fitness Calculator, which adds together all fitness calculations. If that does not meet your needs - for instance, if you want differently-curved fitness calculations - you could write a new Fitness Calculator.
To set up a new Fitness calculation, you need two things:
- A property entry in the FitnessCalculator on the EvolutionManager component, set up with details for each fitness key. The key name will be used by the code to update the fitness value for that agent. See Linear Weight Fitness Calculator for more details on setting up the standard calculator.
- C++ or Blueprint code that calls the "BroadcastFitnessUpdated" event on a FitnessUpdater. (To see more detailed versions of the C++ and Blueprint example code below, you can download, run, and examine the EvolvingBehavior Example project.)
In Blueprint, you can register a fitness updater as follows:
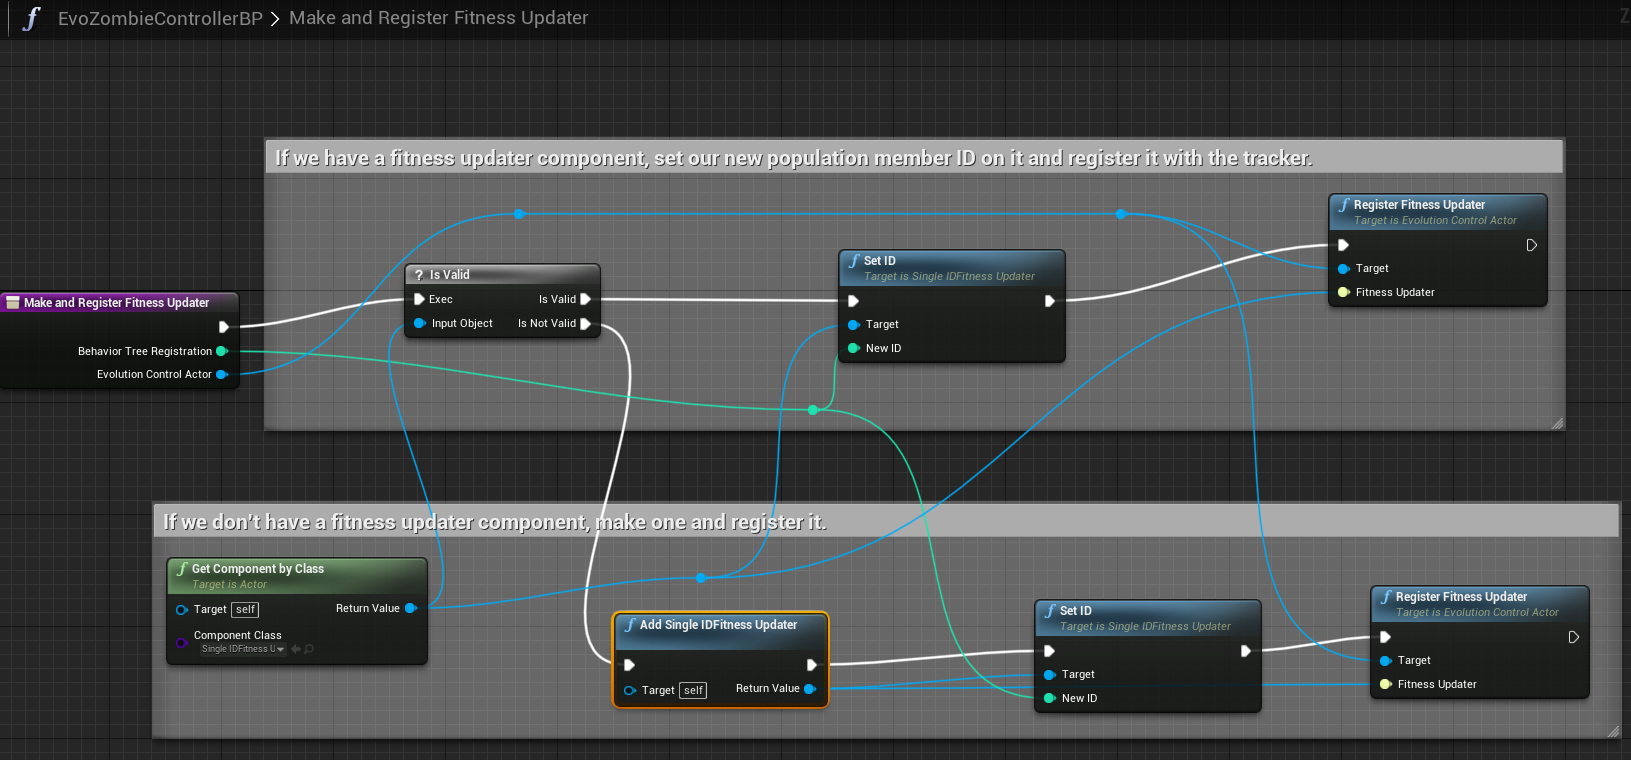
In the shown Blueprint code above, we get or add a Single ID Fitness Updater component, and then call "Register Fitness Updater" on the EvolutionControlActor for this agent's population.
And here is an example of Blueprint code to send a fitness update:
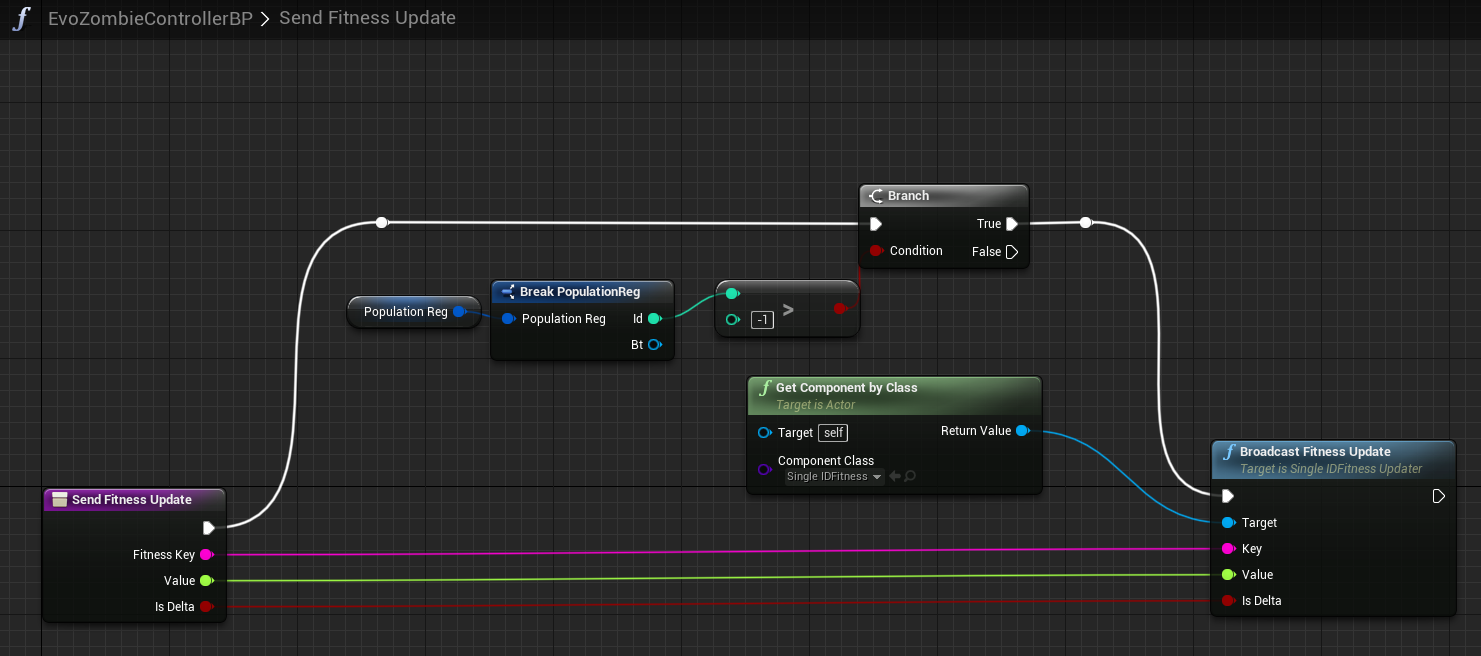
In the shown Blueprint code above, we get our Single ID Fitness Updater component, then call its "Broadcast Fitness Update" function, passing a specific Fitness Key (a String naming the aspect of fitness we want to update), a floating-point new value, and a bool that is true if the new value is a "delta," meaning that it should be added to the previous value, or not (meaning it should directly replace the previous value). In this way, we can either incrementally modify fitness over time, or track it ourself and set the entire value at once.
In C++, this code should find the FitnessTracker for the population, register the FitnessUpdater (which must implement IFitnessUpdater), then call BroadcastFitnessUpdated:
Linear Weight Fitness Calculator
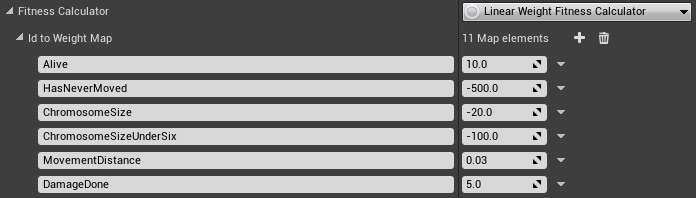
The Linear Weight Fitness Calculator is a built-in, simple fitness calculator. It multiplies each fitness key's value by a corresponding "weight," then adds the result together.
For example, if you had two keys and weight values, "MovementDistance: 2.0" and "PointsScored: 3.0", and the result for the agent was 10 movement distance and 4 points scored, the final fitness for that agent would be: 2 * 10 + 3 * 4 = 32.
You should set up the keys and their corresponding weights in the "Id to Weight Map" property field.
Template Collection
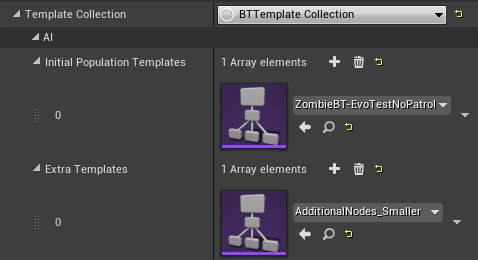
The Template Collection contains the manually-designed behavior tree(s) and the extra library(s) of additional behavior tree nodes you would like the evolutionary process to work with.
You can specify one or more starting behavior trees in the "Initial Population Templates" list. These will be the behavior trees used for the first generation of agents, or, if you specify a Initial Population mutation/generation process, they will be used to start the random mutations that generate the starting population.
The "Extra Templates" are additional behavior trees, but the structure of these trees will be ignored - they will be used as sources of additional pre-set nodes that can be swapped into the behavior trees during certain types of mutation. In this way, these "extra templates" act as "libraries" of nodes to try to place in the real behavior trees.
Generated Template Library
The Generated Template Library contains the information needed to randomly create completely new behavior tree nodes with various properties.
You could use this to allow the evolution to add, for instance, a Wait node that has a random time between 0.5 and 3 seconds, and which may mutate over time to have various values in that range, in later generations.
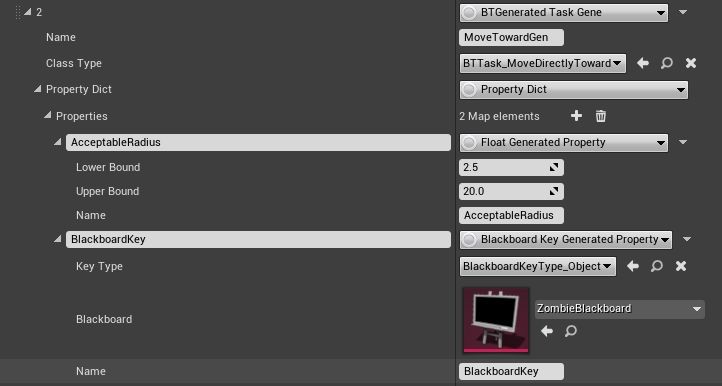
The nodes are separated by type (Task, Decorator, or Service - currently, generated Composite nodes are not supported). In each list, you can add multiple nodes of the appropriate Generated node type, with the following properties:
- Name: The node's name, used to show the node's information and help you recognize it.
- Class Type: The actual Behavior Tree node class that should be generated.
- Property Dict: The properties that should be generated inside the node.
The Property Dict has a set of Generated Properties of various types (float, int, bool, etc.) The "name" of each property must match the name of a real property on the Behavior Tree node type that is being generated (no spaces). The properties, depending on type, may also have a "value" and/or "lower bound," "upper bound," or set of possible values to fill in, to specify what reasonable values may be when randomly mutating them.
For Blackboard properties, you must additionally specify which Blackboard they should use to determine possible values, and which type of Blackboard variables they should allow.
Reproducer
The Reproducer controls how specific Behavior Trees (usually a pair, selected by the Parent Selector) are reproduced and mutated to create a new Behavior Tree for the next generation. Usually, a "Mutating Reproducer" will be flexible enough for most purposes. However, it is also possible to write new types of Reproducer in C++.
In addition to a reproducer, you may also specify a value for "Elitism," which is the process of directly copying a percentage of the most fit individuals from one generation to the next, unchanged (without any mutation). This helps to avoid loss of successful behavior due to random mutation, by ensuring that the most effective individuals from the previous generation continue to have a chance to reproduce, even if none of their offspring were successful. We recommend an "Elitism" of between about 5-20%, depending on the size of the population and volatility of mutation.
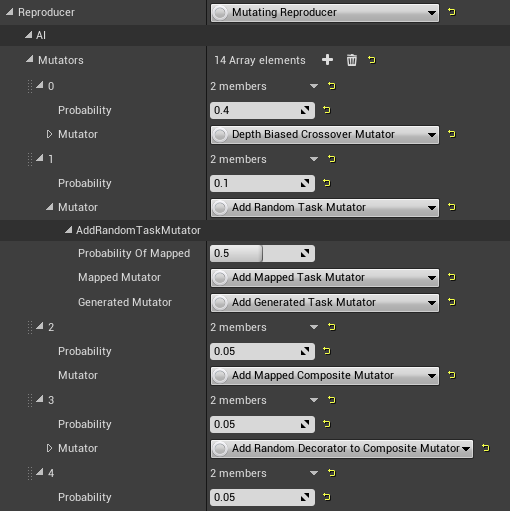
Mutating Reproducer
In a Mutating Reproducer, you can add any number of Mutators and give them specific probabilities of acting to change the child that is created.
The Crossover mutator is a common choice. It picks a random point in each of the two parent Behavior Trees, and replaces the primary parent's sub-tree with the branch selected from the secondary parent, essentially grafting the branch to create a child that is a hybrid of the two parents. The Depth Biased Crossover mutator works similarly, but tends to select nodes closer to the leaves of the tree with a particular probability bias you can set using a property. This could be useful if the standard Crossover mutator is making too many large changes to the tree by selecting central trunk nodes.
Additionally, there are many mutators available that Add, Remove, or Replace random nodes (of particular types) in the child. These are called "point" mutations, because they act on a single node instead of an entire branch.
Some mutators always use nodes from the "Extra Templates," the hand-created nodes in the Template Collection described above. These have "Mapped" in their name. Others always use nodes from the Generated Template Library, generating properties based on the rules there. These have "Generated" in their name. Finally, some mutators will randomly select between Mapped or Generated, with a probability you can set.
There will also be mutators for modifying properties of existing nodes, rather than replacing the nodes entirely. These are a planned feature to be released in a future version of the tool, but they are not yet available at the time of writing.
Parent Selector

The Parent Selector chooses the specific chromosomes to be used as parents for the next generation, and these parents are sent in batches (usually pairs) to the Reproducer.
Selector
The most common Parent Selector is the Tournament Selector. This parent selector randomly selects some number (we'll call it K) of possible nodes from the population. Then, it takes only the highest-fitness node of that small subset. This gives almost every member of the population a chance to be selected, but over time, the more fit parents are more likely to win each small tournament. The larger the size of the tournament (K), the more likely that a high-fitness chromosome will be in the list. Therefore, high values of K will tend towards always selecting high-fitness parents, and lower values will allow more variety and mix in a larger number of less-fit parents. Often, 4 is suggested as a good tournament size (K) to try first.
Initial Population
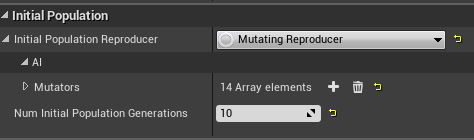
The Initial Population properties provide a way to randomly mutate the input Behavior Trees before starting the experiment, creating more random variety in the initial chromosomes used for the experiment (making variations of the original behavior tree randomly, without regard for fitness).
- Num Initial Population Generations: determines how many generations of random children to create before starting to test fitness.
- Initial Population Reproducer: allows you to configure a separate set of mutators with different probabilities, so you can add more random mutation, or put more limits on the changes, relative to the rest of the experiment generations.
If you set the number of initial population generations very high, the behavior trees may be very different from your original behavior tree. This might be good for initial prototyping and experimenting, but less helpful if you are doing minor tuning on a behavior tree. If you find that all your behavior trees are too similar at the start of the experiment and you end up with the same results all the time, try adding more probability to the mutators (or more mutators), and/or increase the number of initial generations.
Making NPCs Use Behavior Trees From The Population
You will need to test each Behavior Tree generated as part of the Population, in order to find out how fit each evolved Behavior Tree is.
To do this, when you spawn an NPC (or you could switch the behavior tree running on an existing NPC), you can retrieve the next available Behavior Tree from the current Population generation, and set that Behavior Tree to run on the NPC. (To see more detailed versions of the C++ and Blueprint example code below, you can download, run, and examine the EvolvingBehavior Example project.)
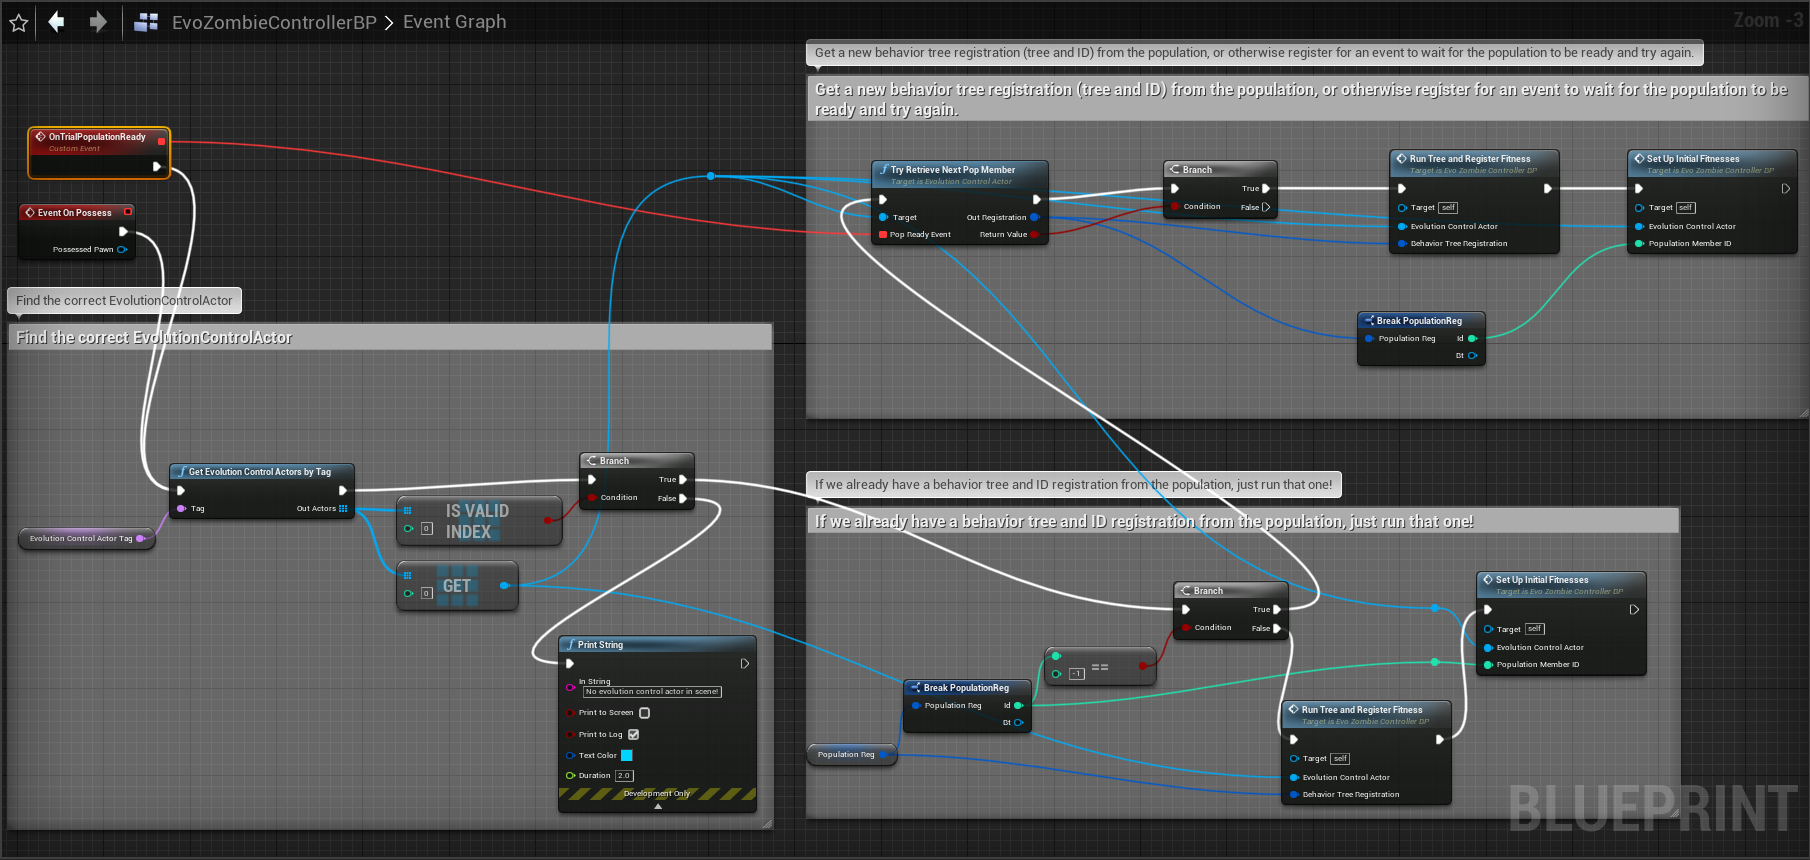
In the Blueprint code above, we first find the EvolutionControlActor with the tag for this pawn's Population, then call "Try Retrieve Next Pop Member" on that EvolutionControlActor. That function returns a "PopulationReg" object with this pawn's new ID (for tracking fitness), and associated Behavior Tree from the population. If we can't get a registration immediately (if the Population is not yet initialized/generated), we can register for an event that will tell us when the Population is ready for us to try again.
In Blueprint, you can run the behavior tree as follows:
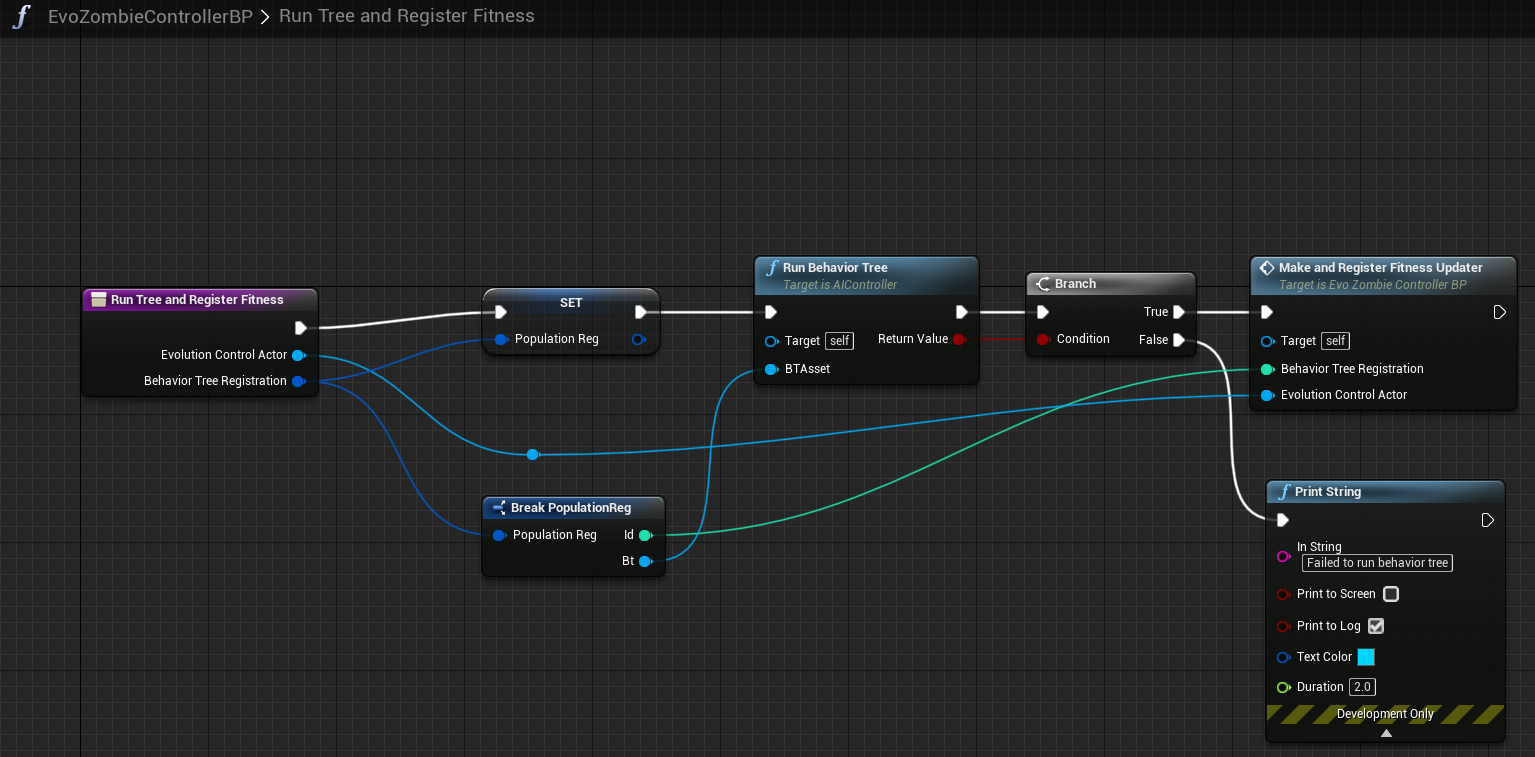
In the Blueprint code above, we call the "Run Behavior Tree" function on our pawn's associated AIController, passing the Behavior Tree we received from registering with the Population. Then, we make and register a Fitness Updater (that Blueprint code is shown above in the Fitness section).
You can also do this in C++, rather than Blueprint. Here is example C++ code to retrieve the behavior tree and set it on the AI Controller for the NPC:
Unreal Engine and OS Settings for Running Experiments
You may want to change some Unreal Engine and computer settings in order to run EvolvingBehavior experiments in the background. By default, both Unreal and Windows will de-prioritize the engine while it's not the main focused window, causing framerates to slow and experiments to run improperly.
The Unreal Engine setting you will want to change is:
- Editor Preferences -> General - Performance -> Editor Performance -> Use Less CPU when in Background: UNCHECK
If on Windows, the Windows 10 setting you may want to change is:
- Control Panel -> System -> Advanced system settings -> Advanced -> Performance -> Settings... -> Advanced, in the options for "Adjust for best performance of:" select the radial button for "Background services."
Additionally, to run physics-based simulation at high speed, you may want to increase the maximum cap on movement simulations per tick. You will need to do this separately for each type of actor you are testing. You can change these settings in the individual Pawn blueprint class, under "Character Movement (General Settings)":
- Max Simulation Iterations - increase up to 16
- Max Simulation Time Step - if increasing iterations is not sufficient, you may also want to change this value
Next Steps
Now that you have started an experiment, you can play against the evolving NPCs (or create opponent AIs to play against them), and then save the results of the experiment.
To learn how to save and look at the results of your experiment, continue reading:
Next Page: Experiment Results: Saving, Loading, Evaluating.
- Generated by
 1.9.5
1.9.5